Last updated: August 8, 2026
Most people looking up how to build a catio have already made the real decision. The cat wants outside, outside is not safe, and an enclosure is the compromise. What is left is the part nobody photographs: whether your HOA allows it, what lumber to buy, which mesh actually keeps a raccoon out, and how the cat gets from the living room into the enclosure without you playing doorman every afternoon.
Below is the sequence in the order you will need it, from the rules check that happens before you buy anything through framing, mesh, the door, the roof, and the cat door connection, then furnishing the inside so your cat treats it as a favorite room. It assumes basic tools and no carpentry background beyond cutting a straight line and driving a screw.
Quick Answer
How do you build a catio from scratch?
- Check the rules first. Lease, HOA, and local permit or setback requirements decide the size and placement before a board is cut.
- Frame with pressure treated 2×4 for the base and posts and 2×2 for the wall panels, then cover everything in galvanized welded wire, never chicken wire.
- Finish with a partly solid roof, a self closing latched door, and a cat flap or window insert so your cat comes and goes without you.
Top Picks on Amazon
Prices and availability may change. Check the current listing on Amazon.


How to Build a Catio: The Full Sequence
Read the whole list before you buy materials. Two steps, the rules check and the cat door decision, change the shopping list completely, and both are easier to settle on paper than after the frame is standing.
Tools: a circular or miter saw, a drill or impact driver, tape measure, speed square, level, tin snips or heavy wire cutters, fencing staples or a staple gun, work gloves (cut mesh edges are unforgiving), and safety glasses.
- Check the rules before anything else. Renters need written landlord approval. HOA covenants often restrict anything visible from the street and may require architectural review, which takes weeks. Many municipalities exempt a small freestanding structure but require a permit once it passes a certain footprint or gets attached to the house, and setback rules govern how close to the property line you can build. One call to the building department answers all of it.
- Pick the location and size. Choose a spot off a room the household actually uses, ideally with a window or door you can convert into the cat’s entry. Watch the sun through the day, since full afternoon exposure with no shade is uncomfortable and full shade never gives the warm patch cats want. Sketch a footprint in 4 foot and 8 foot increments to cut waste and cutting time.
- Prepare the base. An existing slab or deck needs nothing but anchors. On bare ground you have three workable options: pavers or gravel over landscape fabric, a plywood floor on a treated frame raised off the soil, or a buried skirt of mesh extending outward so nothing digs in or out. The ground is the most commonly overlooked side of an enclosure.
- Frame the base and corner posts. Build a perimeter from pressure treated 2×4, check it for square by measuring both diagonals, then stand the posts and tie the structure down with post anchors. A lightweight mesh box catches wind like a sail. Anything touching soil or concrete should be ground contact rated.
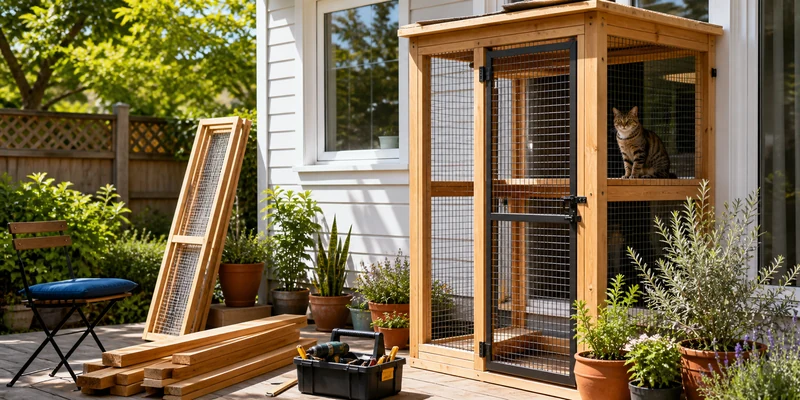
- Build the wall panels. Frame each wall separately from 2×2 stock, with a horizontal mid rail on any span over about 4 feet so the mesh has something to fasten to in the middle. Panels are easier to mesh flat on the ground and easier to remove later if you move or expand. Screw them to the posts once assembled.
- Attach the mesh. Use galvanized welded wire, sold as hardware cloth, in roughly a half inch to one inch opening. Stretch it hand tight over each panel, fasten every few inches, then cap the edges with thin furring strips screwed over the top. Staples alone work loose over a season, while a wood strip clamping the wire along its length does not, and it hides the sharp cut edge.
- Frame and hang the door. Build a human sized door for anything walk-in, because you cannot clean a space you have to crawl into. Hang it on three hinges, add a self closing spring hinge, and fit a latch that has to be actively opened. A gravity latch a cat can nudge upward is the most common escape route in a homemade enclosure.
- Put on the roof. Mesh the whole top for security, then cover part of it with a solid panel, typically corrugated polycarbonate or metal roofing, so there is dry shelter and shade. Slope it so water runs away from the door and overlap the panels as the manufacturer specifies.
- Make the connection to the house. This is what turns a structure into a room your cat uses. Options in rough order of permanence: a flap cut into an exterior door, a flap installed through a wall, a purpose made window insert panel that fits a sash opening, or a mesh tunnel from a window to a freestanding enclosure. Weather seal whatever you cut, and size the flap to your largest cat.
- Furnish the inside. Staggered shelves, a ramp up to them, one high perch with a view over the fence line, a shaded hideaway, and a scratching surface. Fasten every shelf into the framing rather than the mesh. Add water in warm weather and check that plants within reach are non toxic to cats.
- Inspect before the cat goes in. Push on every panel, run a gloved hand along every edge looking for wire ends, shake the shelves, and release the door to confirm it closes and latches by itself. Close any gap at the corners, under the base, or around the cat door that a fist fits through.
- Introduce the cat slowly, then recheck. Prop the flap open, add a familiar blanket and a few treats, and stay present for the first visits. Some cats walk straight out and others take a week. Recheck every fastener after the first month and each spring, since outdoor structures loosen in ways indoor furniture does not.
If that reads like more weekends than you have, a kit is a legitimate answer rather than a lesser one, and our guide to catio kits covers what to look for in mesh, framing, and door design.
Materials: What to Buy and What to Avoid
Most catio failures trace back to a material choice rather than a construction mistake. This is the short version of what holds up outdoors around an animal that climbs.
| Component | Common choice | What to watch |
|---|---|---|
| Base and posts | Pressure treated 2×4, ground contact rated where it meets soil or concrete | Untreated lumber against the ground fails within a few seasons |
| Panel frames | 2×2 stock, with a mid rail on longer spans | Spans over about 4 feet with no mid rail let the mesh bow |
| Mesh | Galvanized welded wire, half inch to one inch openings, 16 gauge or heavier | Galvanized after welding resists rust better than galvanized before welding |
| Mesh fastening | Fence staples plus furring strips screwed over the edges | Staples alone work loose and exposed cut wire is sharp |
| Roof | Corrugated polycarbonate or metal panel over part, mesh over the rest | Without slope and overlap, water pools and finds the seams |
| Fasteners | Exterior rated screws, hot dipped galvanized or stainless | Interior screws rust and stain the wood within a year |
| Finish | Exterior stain or paint, fully cured before the cat goes in | Follow the drying guidance on the can and air the space out |
Two materials come up constantly and both deserve a flat answer. Chicken wire is not suitable. It is thin, the twisted hexagons pull apart under pressure, it rusts quickly, and a determined raccoon can work through it. Insect screen is not a barrier either. It tears under claws and exists to keep bugs out, not cats in. Adding screen behind welded wire is fine as long as the wire does the structural work.
The Door and the Cat Door: The Two Weak Points
An enclosure is only as secure as its openings, and both tend to get designed last when they should be planned early.
The human door. Self closing hardware matters more than the latch style, because the realistic failure is not a cat defeating a lock, it is a door left ajar while someone carries out a water bowl. Add a latch that needs a deliberate motion, and on a large enclosure a small vestibule with two doors means no single opening ever connects the inside to the yard.
The cat door. Cutting a flap into an exterior door is straightforward, since most flaps ship with a template. Cutting through a wall is a bigger job because of framing, insulation, and possible wiring, and it should not be attempted blind. A window insert panel is the reversible route, sitting in a sash opening the way a window air conditioner does, which suits renters and anyone unwilling to cut the house. Consider a microchip or magnetic flap if neighborhood cats might try the trip in reverse. If your only opening is a window, start with window catio boxes rather than scaling a walk-in design down.
If a full enclosure is not happening this year, name the fallback instead of doing nothing. A well placed cat window perch gives a cat the view and the sun without the air, which is not equivalent but beats a closed blind.
Furnishing It So Your Cat Actually Uses It
Owners consistently report the same pattern: a large empty enclosure gets less use than a small one with levels. Cats want vertical layers, a view, and sun and shade within a few steps of each other.
- Stagger the shelves. Offset each one sideways so the climb reads as a staircase rather than a ladder, and keep the rises modest for kittens, heavy cats, and older cats.
- Plan the descent. Cats come down less confidently than they go up, so a route ending in one long drop tends to go unused.
- Anchor into the framing. A perch that shifts underfoot gets abandoned. The principles behind cat wall shelves apply here, with weather rated hardware.
- Give both sun and shade. The solid roof section provides one and the open section the other, and the cat chooses through the day.
- Add a hideaway and a scratching surface. A covered box for retreating when a dog passes the fence, and a sisal wrapped post so the scratching has a legitimate target outdoors.
- Think about cleaning. Surfaces you can hose down, and no corner you cannot reach, because a space you cannot service is one you will neglect.
Common Mistakes When Building a Catio
- Building before checking the rules. An HOA letter arriving after the roof goes on is an expensive way to learn the process.
- Using chicken wire or insect screen. Neither is a barrier against a determined animal on either side.
- Ignoring the ground. Cats dig out and other animals dig in. Pavers, a floor, or a buried mesh skirt closes it.
- A door that can drift open. Self closing hardware plus a positive latch, every time.
- No solid roof section. Fully open means unusable in rain and uncomfortable in full sun.
- Leaving sharp mesh edges exposed. Cap every cut edge with a furring strip or trim.
- Skipping the tie down. A mesh box is light and catches wind, so anchor it to the deck, slab, or ground.
- Putting it where nobody goes. An enclosure behind the garage sees a fraction of the use of one off the room where you spend your evenings.
- Expecting instant enthusiasm. Give a hesitant cat a week of propped open access before concluding the build was wasted.
Where to Go From Here
Still weighing whether to build at all? Seeing the full range of formats first helps, and what a catio is lays out the five common types and who each one suits. If your honest constraint is time rather than skill, comparing prebuilt options in our roundup of catio kits is the sensible next move, since modular kits can often be extended later the way a custom build can. Before your cat moves in, our notes on cat furniture safety are worth a read for the stability and materials side, and renters juggling what is allowed will find more workarounds in cat furniture for renters.
Frequently Asked Questions
Do I need a permit to build a catio? It depends on where you live, how large the structure is, and whether it attaches to the house. Small freestanding enclosures are often exempt while larger or attached ones may not be, so call your local building department before you start.
What kind of wire should I use for a catio? Galvanized welded wire, sold as hardware cloth, with openings around half an inch to an inch. Chicken wire is not suitable, since it rusts, pulls apart under pressure, and leaves sharp edges.
What size lumber do I need? Pressure treated 2×4 for the base and corner posts, 2×2 for the wall panel frames, with a mid rail on spans longer than about 4 feet. Use exterior rated screws throughout.
How big does a catio need to be? Smaller than most people assume, as long as it goes upward. A tall narrow enclosure with staggered shelves gets more use than a wide empty one, and the format overview compares the types on space.
Can I build a catio if I rent? Sometimes, with written landlord permission and in a reversible format. Window units that sit in a sash opening avoid cutting the building.
Is building cheaper than buying a kit? Often, though it costs weekends instead. A build wins on fitting an awkward space exactly, while a kit wins on speed and on arriving with the parts already cut.
The Bottom Line
Building a catio is a straightforward carpentry project with two decisions that matter more than the woodwork: clearing the lease, HOA, and permit rules before you buy anything, and choosing galvanized welded wire over chicken wire. Frame a treated base and posts, panel the walls in 2×2 stock, roof part of it solid, hang a self closing door, and connect it to the house with a cat flap or window insert. Then furnish it with staggered shelves and a shaded perch, and give your cat a week to decide it lives there now.