Last updated: August 8, 2026
The shelves arrived, the hardware bag is open on the floor, and now you are staring at a blank living room wall wondering where the framing actually is. Learning how to install cat wall shelves is less about carpentry skill than about two decisions you make before the drill comes out: what is behind the drywall, and how a cat will move across the finished route. Get those right and a shelf holds for years. Get them wrong and you find out the hard way, usually at three in the morning.
Below is the full sequence: the tools worth having, how to find studs on standard 16 inch spacing, which fasteners suit drywall, plaster, and masonry, how to lay out heights and gaps so a cat can climb and come back down, and how to load test each shelf with your own hands before your cat ever sees it.
Quick Answer
How do you install cat wall shelves safely?
- Find the studs first. In most US homes framing runs 16 inches on center, sometimes 24 inches, and a screw into solid wood beats any drywall anchor.
- Where a stud is not available, use a heavy duty toggle style anchor rated well above your cat’s weight, because a landing cat produces far more force than a resting one.
- Mark a level line, mount one shelf at a time, then hang your own weight off each bracket before your cat is allowed near the wall.
Top Picks on Amazon
Prices and availability may change. Check the current listing on Amazon.


How to Install Cat Wall Shelves: Step by Step
Work through this in order and do not skip the test at the end. Set aside an afternoon for a first wall. A short run of three or four shelves goes faster than people expect once the layout is marked.
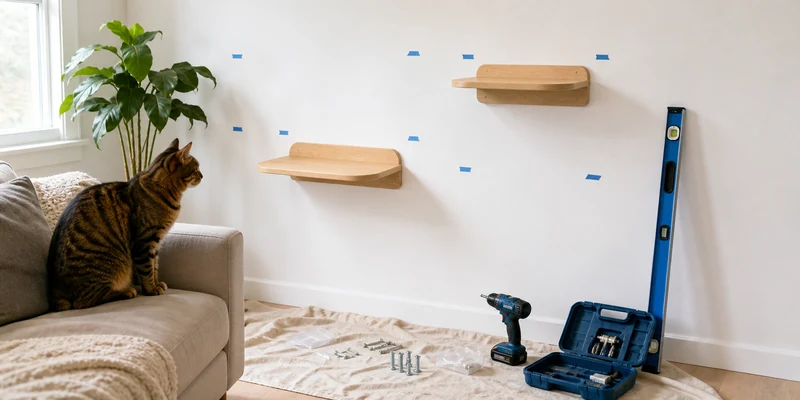
What you need: a stud finder, a pencil, a tape measure, a level (a phone level app works for short brackets), a drill with a driver bit, drill bits sized to your fasteners, the screws and anchors that suit your wall, and a vacuum or a damp cloth for dust. Safety glasses are worth wearing for anything overhead.
- Pick the wall and the route. Choose an interior wall in a room the household uses, near a window if you can. Sketch the path on paper: where the cat gets on, where it climbs, and how it comes back down. Avoid walls with a doorway swinging into the run.
- Check what is inside the wall. Steer clear of the area directly above and below light switches and outlets, where wiring runs vertically, and of the wall behind a kitchen or bathroom fixture, where pipes may sit. If the wall backs onto plumbing, move to another wall rather than guessing.
- Find and mark the studs. Run an electronic stud finder horizontally at the height you plan to mount, and mark both edges of each stud so you can pencil the center between them. Confirm the spacing before you trust it (see the section below).
- Mark your heights and mount points. Measure up from the floor and mark each shelf position, then hold the bracket or shelf against the wall over your pencil marks. Transfer the screw holes with the bracket in place rather than measuring them separately.
- Level every mark. Set the level across the mount points for a single shelf and adjust before you drill. On a run of several shelves, snap or tape a reference line first so the whole wall reads straight. Floors in older homes are rarely level, so measure from a level line rather than from the floor.
- Drill pilot holes. Into a stud, drill a pilot slightly narrower than the screw shank so the threads bite. For an anchor, drill the exact diameter the anchor packaging specifies, no wider. Hold the drill square to the wall, since an angled hole reduces holding power.
- Set the fastener. Drive stud screws until the bracket is tight against the wall without crushing the drywall paper. With toggle style anchors, follow the sequence on the package precisely: most need the toggle fully deployed behind the board before the screw is tightened.
- Mount the shelf and check it. Attach the shelf to the bracket, then put the level back on the surface. Small adjustments are far easier now than after the next shelf goes up.
- Repeat one shelf at a time. Finish each shelf completely before starting the next. It sounds slower and is not, because a single misplaced hole in a long run forces you to redo everything above it.
- Load test the wall. Press down hard on the outer edge of each shelf, then lean into it and add a sideways shove. Nothing should flex, creak, or pull at the wall surface. Only then let your cat into the room.
- Add the soft surfaces last. Non slip pads, carpet, or sisal on the shelf tops give a cat traction on landing. Bare varnished wood is slippery, and a cat that skids once may avoid the shelf afterwards.
- Recheck after two weeks. Screws settle and anchors bed in. Retighten anything that has loosened, then check the whole run twice a year.
If you are still choosing the shelves themselves, our hub guide to cat wall shelves covers formats, depths, and mounting systems, which is worth reading before you commit to a layout.
Studs, Drywall, and the 16 Inch Rule
Most US homes built with wood framing place studs 16 inches on center, meaning the distance from the center of one stud to the center of the next. Some newer construction and some garage or non load bearing walls use 24 inches on center. Once you have located one stud reliably, measure 16 inches sideways and probe again. If you find a second stud there, the pattern usually holds across the wall and you can predict the rest.
Electronic stud finders are helpful but not infallible. They can read the seam where two sheets of drywall meet, or a horizontal fire block, as a stud. Two cheap confirmations: knock along the wall and listen for the dull sound of solid backing rather than a hollow one, and drill your pilot hole a little narrow so you feel wood resistance instead of the bit dropping into a cavity. If a pilot hole misses, fill it, move over, and try again. A patched hole is nothing compared with a shelf that pulls out.
Corner studs, doubled studs beside door and window openings, and metal studs in some apartment buildings all break the rhythm. Metal framing is thinner and hollow, so it needs screws or anchors designed for steel studs rather than standard wood screws.
Which Fastener Suits Your Wall Type
The wall decides the hardware, not the shelf. Here is how the common US wall types behave, so you know what to buy before you start.
| Wall type | What to use | Watch out for |
|---|---|---|
| Drywall over wood stud | Wood screws long enough to reach well into the stud. The strongest option available in a typical home. | Screws that only catch the edge of a stud. Center the pilot hole. |
| Drywall, no stud available | Heavy duty toggle style anchors that open behind the board and spread the load. | Plastic expansion anchors and small self drilling anchors are not suited to a climbing cat. |
| Plaster and lath (older homes) | Screws into the lath or, better, into the stud behind it. Drill slowly to avoid cracking. | Plaster crumbles and the surface can look sound while the key behind it has failed. |
| Metal stud framing | Anchors or screws made specifically for steel studs. | Standard wood screws strip out of thin steel. |
| Brick, block, or concrete | Masonry sleeve anchors or screws with a hammer drill and a matching masonry bit. | Drilling into the mortar joint rather than the brick holds less well. |
| Rented apartment, no drilling | Floor standing alternatives instead. Wall shelves are not a no damage format. | Adhesive strips and tension systems are not a substitute for a load bearing fixing. |
One point that trips people up: the weight rating printed on an anchor package is a static rating for a load that hangs quietly. A cat jumping onto a shelf lands with considerably more force than it weighs standing still, and it also pushes sideways when it launches off. That is why the advice is to over specify rather than to match your cat’s weight, and why a stud is worth walking your layout around. If the shelves you are looking at are being mounted for a heavy cat, our guide to sturdy cat wall shelves goes into bracket construction and load in more detail.
Renters have a genuinely different problem, since even correct installation leaves holes. Small screw holes in drywall patch easily and most leases tolerate them, but anchor holes are wider and masonry holes are permanent. Read the lease before the drill comes out, and if drilling is off the table, cat furniture for renters covers the freestanding routes that give a cat the same height.
Planning Heights and Gaps So Your Cat Can Actually Use It
A wall run that looks great in a photo can be unusable if the spacing ignores how cats move. Healthy adult cats jump comfortably in a range that varies a lot by age, weight, and build, so the sensible approach is to watch your own cat before you drill. Note how high it hops onto the counter or the back of the sofa, and treat that as your working maximum rather than a number from the internet.
- Start low. The first shelf should be reachable from the floor or from a piece of furniture your cat already uses. Many good installations begin at a sofa arm, a bookshelf, or a window sill.
- Keep the rises modest. Shorter, staggered steps get used more than long dramatic leaps, and they matter enormously for kittens, heavy cats, and older cats.
- Stagger horizontally, not just vertically. Offsetting each shelf sideways gives the cat a diagonal staircase instead of a ladder it has to jump straight up.
- Plan the way down. Cats descend less confidently than they climb. A route that ends in a single long drop tends to go unused, so end the run near a shelf, a cabinet, or a tall piece of furniture.
- Give two exits. A dead end shelf is a trap in a multi cat home. Loop the route or leave a second way off at the top.
- Mind the depth. A shelf a cat can turn around on comfortably is more useful than a narrow ledge, especially for a large breed.
- Check the landing zone. Nothing fragile, no glass tables, no floor lamps under the route.
Sizing the shelves themselves to a big cat is its own question, and cat wall shelves for large cats covers depth, bracket spacing, and what changes when a Maine Coon is doing the jumping.
Test It Before Your Cat Does
This is the step people skip, and it is the one that separates a wall that lasts from one that fails quietly. The goal is to load each shelf harder than your cat ever will, while you are the one in control.
Press down on the outer edge. The far corner of a shelf is where leverage on the bracket is highest. Lean on it with the heel of your hand and put real weight behind it. Any creak, flex, or movement in the drywall around the screw means the fixing is not right.
Add a sideways push. Cats do not land politely. They arrive at an angle and push off sideways, so shove each shelf left and right as well as down. Brackets that only resist downward force are a poor fit for climbing furniture.
Hang from the lowest shelf if it is rated for it. On a mount into a stud with a solid bracket, putting a chunk of your own body weight on the lowest shelf is a fair stress test. Do not do this on an anchored only mount or on a decorative shelf, and never on the shelves near the ceiling.
Look at the wall, not the shelf. The early warning sign is usually the wall surface: hairline cracks around a screw head, a slight dimple, a bracket that no longer sits flush. Note anything you see and address it now.
Watch the first sessions. Encourage your cat up with a treat or a wand toy rather than lifting it onto a shelf, and stay in the room for the first few climbs. If the route goes unused for a week, the layout is usually the reason rather than the idea. General cat furniture stability applies here too, and cat furniture safety covers tipping, weight limits, and materials across every format.
Common Installation Mistakes
- Trusting the stud finder without confirming. A drywall seam and a stud can read the same. Confirm with a narrow pilot hole.
- Using plastic expansion anchors. They are made for picture frames, not for an animal launching off a ledge.
- Measuring heights from the floor. Floors slope. Work from a level reference line instead, or your run will drift.
- Mounting everything before testing anything. Finish and test one shelf, then move on.
- Spacing for a photograph. Wide gaps look striking and get ignored by real cats, particularly older ones.
- Forgetting the descent. A route with no comfortable way down is a route your cat uses once.
- Leaving surfaces slippery. Bare finished wood costs traction on landing. Add carpet, sisal, or non slip pads.
- Never rechecking. Fixings loosen with months of impact. Put a twice yearly check in your calendar.
Where to Go From Here
If your wall run needs a shelf shape that nobody sells, building one is a reasonable next step, and DIY cat wall shelves walks through materials, bracket choices, and finishing. If instead you are still deciding what to buy, go back to the hub guide on cat wall shelves, then read up on sturdy cat wall shelves if a heavy or enthusiastic cat is going to be using them. And if your cat treats the new shelves as an invitation to scratch the wall corner beside them, stopping a cat from scratching furniture covers redirection.
Frequently Asked Questions
Do cat wall shelves need to be mounted into studs? Into studs is the stronger option and worth designing your layout around. Where a stud is not available, heavy duty toggle style anchors that open behind the drywall are the usual alternative. Plastic expansion anchors are not suitable.
How far apart are studs in a typical home? Usually 16 inches on center in US wood framing, sometimes 24 inches. Find one stud, measure 16 inches sideways, and probe again to confirm the pattern before you rely on it.
How much weight can a cat wall shelf hold? It depends on the bracket, the fastener, and the wall, so treat the printed rating as a starting point rather than an answer. A landing cat generates more force than its standing weight, which is why a wide margin above your cat’s weight is the sensible target.
How far apart should cat shelves be? Close enough that your cat steps rather than strains. Watch how high it jumps onto furniture it already uses and stay within that, staggering the shelves sideways so the run works as a staircase.
Can I install cat wall shelves in a rental? Often yes, but they leave holes and there is no genuinely damage free way to mount a load bearing shelf. Check your lease first, and see cat furniture for renters for freestanding options if drilling is not allowed.
My cat will not use the new shelves. What now? Give it a week or two, add traction to the surfaces, and make sure the lowest shelf is reachable from furniture. Reward your cat while it is on a shelf rather than lifting it up there, which usually backfires.
The Bottom Line
Installing cat wall shelves comes down to finding the framing, matching the fastener to your wall, and marking a level layout your cat can actually climb and descend. Mount and test one shelf at a time, pressing and shoving each one harder than a cat ever will before the room is opened up. Then add traction to the surfaces, watch the first climbs, and recheck every fixing twice a year.