Last updated: August 8, 2026
Most people start looking into how to make a cat tree for one of two reasons. Either nothing on the market fits the corner they have in mind, or they already owned a store bought tower that wobbled, shed carpet, and ended up in the garage. Building your own solves both problems, because you control the footprint, the height, the materials, and above all the stability.
This guide walks through the build in order: sketching a design that suits your cat and your room, choosing plywood, posts, unoiled sisal rope, and non toxic glue and finish, assembling from the base up, wrapping the posts so the rope stays tight, and covering the platforms so a landing cat has grip. No advanced woodworking is involved.
Quick Answer
How do you make a cat tree that actually holds up?
- Build on a base that is wide and heavy. As a working rule it should reach at least as far out as the outermost edge of the highest platform, and thicker plywood beats thin.
- Use 3/4 inch plywood for the base and platforms, solid lumber posts, and natural unoiled sisal rope. Skip particleboard, oiled baler twine, and solvent heavy adhesives.
- Assemble bottom up, wrap each post before it goes on the tree, and strap anything tall to a wall stud.
Top Picks on Amazon
Prices and availability may change. Check the current listing on Amazon.


How to Make a Cat Tree: Step by Step
Read the whole sequence before you cut anything. Several steps are far easier before the tree is standing up, which is why the order matters. A simple two level tower is a weekend project.
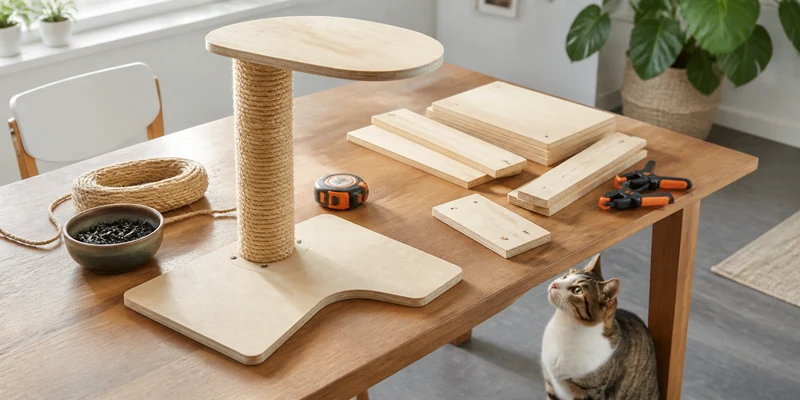
Tools: a circular saw or jigsaw (many home centers will cut sheet goods to size for you), a drill with driver and countersink bits, a heavy duty staple gun, tape measure, square, level, sandpaper, sharp scissors or a utility knife, and gloves. Sisal is rough on hands after the first few feet.
- Watch your cat first. Note where it already sleeps, how high it jumps without hesitating, and whether it likes to be enclosed or out in the open. A tree built for the cat you have gets used.
- Sketch the design and write down every measurement. Draw the tree from the front and from above before you buy anything. This is the step people skip and regret. See the sizing section below for what actually matters.
- Cut the base and platforms. Cut the base oversized rather than tight. Round the corners slightly and sand every edge so nothing catches a paw or snags fabric.
- Cut the posts to length, both ends square. A post cut at even a slight angle leans, and the lean multiplies over the height of the tree. Check each cut with a square.
- Finish any wood that stays visible. Sand and finish now, while the parts are flat and separate, and let a water based finish cure fully before the cat has access.
- Wrap the posts with sisal. Do this while the posts are loose and you can roll them on the floor. Full technique is in the wrapping section below.
- Attach the first post to the base. Screw up through the underside into the end of the post, countersunk so no head sits proud on the floor side. Two or more screws per post, never one, since a single screw lets the post pivot.
- Check for plumb before you go higher. Put a level on two adjacent faces. Correcting a lean now takes a minute; after three platforms it takes an hour.
- Add platforms from the bottom up. Screw down through each platform into the post below, then set the next post on top and screw up from underneath, so every platform sandwiches into the structure rather than hanging off the side.
- Test the frame bare. Before any fabric goes on, push the top sideways with real force and lean on the outer edge of the highest platform. Nothing should rock, creak, or lift the base. The frame does not get stronger once it is covered.
- Upholster the platforms. Carpet, fleece, or faux fur, stapled from underneath so no staple sits where paws land. Details in the covering section below.
- Add extras and anchor it. A hanging toy, cubby, or hammock is optional; keep strings short and secure. If the tree is tall, run a furniture strap or L bracket from the top platform to a wall stud, which turns a stable tower into a tip proof one.
- Clean it, air it out, and introduce it slowly. Vacuum the sawdust and rope fibers, let any finish or adhesive smell dissipate completely, then place the tree and let your cat find it in its own time.
If at any point you decide you would rather buy than build, that is a sensible outcome. Our hub guide to cat trees covers formats, heights, and what separates a tower that lasts from one that wobbles by month three.
Design and Dimensions: Getting the Sizing Right
Most failed homemade cat trees fail at the sketch stage rather than the build stage. Three dimensions carry the outcome.
The base footprint. Stability comes from the relationship between how far the tree reaches sideways and how wide it sits on the floor. The practical rule: your base should extend at least as far as the outermost edge of the highest platform, and preferably further. A cat landing on a cantilevered top perch applies its weight and its momentum at the point of maximum leverage, which is exactly where a narrow base gives way. Doubling up two layers of plywood adds weight low down for very little money.
Platform size. Measure your cat stretched out from nose to base of tail and treat that as the minimum useful dimension for a sleeping platform. A cat should be able to turn around and curl up without hanging in space. Large breeds need noticeably more surface than the small round discs common on budget towers, which is one of the main reasons owners of a Maine Coon go the DIY route.
Vertical spacing. Set the rise between levels inside what your cat jumps comfortably today, not what a healthy young cat could theoretically manage. Staggering platforms sideways rather than stacking them straight up turns the tree into a staircase that kittens, heavy cats, and older cats can all use. Plan the way down as well, because cats descend far less confidently than they climb, and a top perch with one long drop below it gets abandoned.
Where the finished tree goes matters as much as how you build it, and where to place a cat tree covers window views, traffic routes, and the spots cats reliably reject.
Materials: What to Buy and What to Avoid
The list is short, and a few choices matter far more than the rest.
| Part | Good choice | Avoid |
|---|---|---|
| Base and platforms | 3/4 inch plywood, ideally birch or another sanded grade with few voids. Stiff and screw friendly. | Particleboard and thin MDF. They sag under a cat and chew up screw threads. |
| Posts | Solid lumber in a 4 by 4 or similar section, or a heavy wall cardboard tube for a lighter build. | Thin PVC and hollow tubes that flex, and posts too narrow to take screws into the end grain. |
| Rope | Natural sisal rope, unoiled and undyed. Around 3/8 inch diameter is easy to handle on posts. | Oiled sisal and agricultural baler twine. The oil smells and transfers to fur and floors. |
| Adhesive | Water based PVA wood glue, used sparingly on the rope. Low odor and inert once cured. | Solvent heavy contact cements and anything with a lingering smell. Cats live at surface level. |
| Fasteners | Wood screws long enough to bite well into the post end, driven through countersunk holes. | Nails, staples used as structure, and single screw connections that let a post rotate. |
| Covering | Cut pile carpet, fleece, or faux fur, stapled from underneath. Removable covers ease cleaning. | Looped carpet, which catches claws, and loose weaves that shed long strands. |
| Finish | Water based polyurethane or another low VOC finish, fully cured. Bare sanded wood is also fine. | Old paint or varnish of unknown origin, and any finish still off gassing at first use. |
Two points deserve emphasis. Unoiled sisal is not a detail: oiled rope is cheaper and widely sold for agricultural use, and owners who try it consistently report a persistent smell plus oily marks wherever the cat rubs. Look for rope described as natural, unoiled, or made for cat scratching posts. For why this material outperforms carpet and cardboard, our guide to the sisal cat tree compares rope with woven sisal fabric and how each wears.
And non toxic means fully cured, not just labeled safe. Water based finishes and PVA glue are reasonable choices precisely because they lose their odor quickly, but give them the full cure time on the container. If you can still smell it, the cat certainly can.
Building for Stability: The Part That Matters Most
A homemade tree that tips is worse than no tree at all, and stability is decided almost entirely at the workbench.
- Go wide and heavy at the bottom. The single most effective structural decision in the build, and the cheapest.
- Keep the mass low. Put a heavy cubby or enclosed box on the lower half and keep the upper platforms light.
- Screw through the base into the post ends. Countersink from underneath, and use two or more screws so the joint cannot pivot.
- Keep every post plumb. Small leans compound and put every joint above them under permanent stress.
- Limit unsupported overhang. A platform reaching far past its post is a lever. Shorten the reach or add a second post under the far end.
- Anchor tall builds. An anti tip strap into a stud is standard practice for tall furniture and applies here too.
- Retest after a few weeks. Screws settle under repeated impact. Snug everything once early, then check twice a year.
Test the way a cat behaves rather than the way furniture sits: shove the top sideways, press hard on the outer corner of each platform, and watch whether the base lifts. The broader principles here, tip over risk, weight limits, and material safety across every format, are covered in cat furniture safety.
Wrapping the Posts With Sisal Rope
This step separates a tree your cat scratches for years from one that unravels in a month. It is not difficult, but it rewards patience.
- Wrap before assembly. A loose post can be rolled on the floor while you feed the rope, which is faster and produces tighter wraps than working around a standing tree.
- Anchor the starting end out of reach. Staple the rope near the very bottom, where the base covers it or claws rarely reach, and drive the staple flush. Some builders drill a small hole and tuck the end in instead.
- Keep constant tension. Pull every wrap firm and push it hard against the one before, leaving no bare post visible. Rope that goes on slack loosens further as the cat works it.
- Glue in sections, not all over. A thin bead of wood glue every few inches gives the wrap something to hold without soaking the rope stiff. Fully coated rope loses the texture cats want.
- Rotate the post, not the rope. Keep the working section in front of you and let the post turn. Wear gloves; sisal takes the skin off your palms quickly.
- Finish the top end hidden. Stop where a platform will cover the wrap, then staple and trim. On an exposed post top, drive the last staples fully flush.
- Plan for replacement. Rope wears out, and one advantage of building your own is that you can strip and rewrap a post in an evening. Build the top platform so it unscrews and you have made that job easy.
How much rope a post takes depends on its diameter, its height, and the rope thickness, so buy generously rather than exactly. Running out three quarters of the way up and then finding a slightly different batch is a common annoyance.
Covering the Platforms
Upholstery is the forgiving part of the build. It hides imperfect cuts, adds the traction a landing cat needs, and can be redone whenever it looks tired. Cut the fabric with an overhang on every side, lay the platform face down on it, then pull the fabric around the edge and staple into the underside, working opposite sides alternately so tension stays even. Fold the corners like wrapping paper rather than cutting them, and trim the excess only after everything is stapled.
Cut pile carpet, fleece, and faux fur all work. The material to avoid is looped carpet, since claws hook into the loops and pull threads out, occasionally catching a cat in the process. No staple should end up on a surface a cat lies on, and loose threads should be trimmed as soon as they appear. Two refinements are worth the effort: leave the base uncarpeted or cover it with something wipeable, and make the top platform cover removable so you can wash it.
Common DIY Cat Tree Mistakes
- A base that is too small. The most frequent structural failure by a wide margin. Wider and heavier is nearly always the answer.
- Particleboard platforms. They feel fine on day one and sag or split at the screws later.
- Oiled sisal rope. Cheap, easy to find, and a lasting mistake once the smell is in your living room.
- Wrapping rope loosely, or gluing it solid. Slack wraps migrate and unravel; a soaked wrap goes hard and stops being satisfying to scratch.
- Building from a design photo. Striking proportions on a screen often ignore how far a real cat jumps and how it gets back down.
- Skipping the bare frame test. Once carpet is stapled on, fixing a wobble means taking it back off.
- Rushing the cure time. Glue and finish need to be fully off gassed before a cat sleeps on them.
- Leaving a tall tree unanchored. A strap to a stud takes five minutes and removes the worst failure mode entirely.
Where to Go From Here
If the build went well, the natural next project is vertical space that uses no floor at all: DIY cat wall shelves covers materials, brackets, and route planning, and a tree plus a wall run works better together than either alone. If your cat ignores the new tree, the cause is usually placement or the scratching surface rather than the build, and do cats need a cat tree explains what the furniture is doing for a cat. And if you conclude that buying is the better use of your weekend, start at the cat trees hub, or go straight to cat trees for large cats if a big cat is doing the climbing.
Frequently Asked Questions
Is it cheaper to make a cat tree than to buy one? In materials, usually yes compared with a mid range or premium tower, especially if you already own the tools. What you trade is time, and a first build takes most people a full weekend including finishing.
What kind of rope should I use? Natural sisal rope that is unoiled and undyed. Oiled rope and baler twine smell and leave residue on fur. Our guide to the sisal cat tree compares rope with woven sisal fabric.
What wood should I use for the platforms? Three quarter inch plywood is the practical standard, since it holds screws well and does not sag. Particleboard and thin MDF are the materials to avoid.
Is wood glue safe for cats? Standard water based PVA wood glue is low odor and inert once fully cured, which is why it is the usual choice. Let everything cure completely before your cat has access, and skip solvent heavy adhesives.
How do I stop my homemade cat tree from wobbling? Widen and weight the base, keep every post plumb, use at least two screws per connection, limit how far platforms overhang, and strap tall builds to a wall stud.
Can I build a cat tree without power tools? Partly. Many home centers will cut sheet goods to your measurements, which removes the hardest cuts, but you will still want a drill. Hand driving screws into plywood edges is slow and tends to split the wood.
The Bottom Line
Making a cat tree is straightforward carpentry where a handful of choices decide the outcome: a wide, heavy base, 3/4 inch plywood platforms sized to your actual cat, solid posts wrapped tightly in unoiled sisal, and water based glue and finish given time to cure. Build from the base up, wrap the posts while they are still loose, and test the bare frame hard before any fabric goes on. Strap anything tall to a stud and you end up with a tower that fits your room and outlasts most of what you can buy.